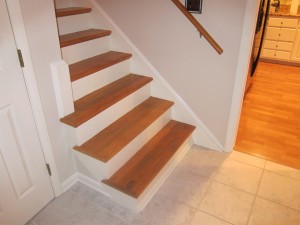
Question: We are moving into a split-level house (first-time home buyers) from an apartment so we are navigating the world of toddler-proofing stairs for the first time. The stairs have a railing on one side wall, and on the other side, nothing. The wall with nothing ends about three stairs above the ground floor, leaving an open space that strikes us as a hazard for an 18-month-old who is just learning about stairs. Installing a gate seems tricky in this instance since there aren’t two sides for the gate unless we put it across the third step. How would you recommend we handle this?
— Bethesda
Answer: “Wrap a gate around the bottom,” advises Bill Brooner, owner of Baby Proofing Montgomery, a company that does home safety evaluations and installs products that make homes safer for young children. He has a catalog of safety equipment that includes five or six pages of gates, and he can make a specific recommendation and give you a cost estimate if you email him with measurements and a photograph. Or, for $90 plus a travel fee of $25 when the location is outside Montgomery County, he will go to your house for a room-by-room safety evaluation that typically lasts 1½ to 2 hours. He’ll also leave you with a packet of safety literature covering everything from toy safety to poisonous house plants.
If you want to tackle the job on your own, start with an extra-wide safety gate or safety fencing designed for use around fireplaces and wood stoves. Many models also have optional extension pieces that allow you to create custom lengths. Fasten one end of the gate to the wall with the handrail. Extend the wrap across the base of the stairs and wrap it around the side of the steps where there is no wall. If you have room at the base of the stairs, you might want to position the fencing so it’s set out from the bottom step, allowing you to open and close the gate when you aren’t also negotiating the stairs.
Be sure to install a safety gate at the top as well as at the bottom.
Sure, opening and closing the gates is a hassle. But it’s not forever. Kids vary, but by age 3 or 4, they’re usually fine without gates, Brooner says.
Question: I have two old “bridge chairs” from my mom, probably from the 1950s or ’60s. They aren’t in horrible shape, but the wood (real wood) needs touching up. If I were to paint the wood, is there a type of spray paint that would look best on real wood? Or do you think I should touch up the finish? If so, what product do you recommend?
— Arlington
The chairs are classics and look pretty classy as they are. It’s basically your call about whether to just erase some of the wear and tear or to give the chairs a whole new look with paint. You can always paint later; it’s much harder to go back to unpainted wood.
If you decide to fix the existing finish, the best strategy depends on how bad it is now. (It’s hard to tell from the pictures you sent.) If the finish looks OK except for a few places where it’s scratched through to bare wood, a simple touch-up works best. Dab on a little wood stain with an artist’s brush or use wood stain packaged in a marking pen, such as Minwax Wood Finish Stain Marker . If there are deeper gouges, fill them with non-hardening wood putty in a matching color. This type of putty is oily or waxy, so it works well when furniture already has a finish, as your chairs do. It comes in jars or tubs, as well as in a pencil style (such as the Minwax Blend-fil Pencil) and in wax sticks (included in the Dap Wood Finish Repair Kit).
You need more than spot repairs if the overall finish is worn and scuffed up. Use a finish restorer, such as Howard Restor-a-Finish, which works on lacquer, shellac and varnish, the finishes most likely to be on your chairs. Finish restorers contain stain plus a little solvent and oil. The solvent helps the stain penetrate but doesn’t strip the existing finish. Rub over the wood, a section at a time, as directed on the label and you should wind up with a nice, even sheen where scratches aren’t very noticeable, if you can even find them. You can use a finish restorer instead of or in addition to the touch-up methods.
If you opt for painting the chairs, you can use any good-quality spray paint. Choose a gloss sheen if you want a traditional furniture finish. If you don’t have a good place for spray-painting, use brush-on, glossy, water-based paint. For that, lightly sand the chairs first with 100-grit sandpaper, just enough to scratch up the surface. Sand in the direction of wood fibers (meaning lengthwise on the legs and crosswise on the chair backs). Wipe up the debris, brush on primer paint and let it dry, then apply two coats of the finish paint.